
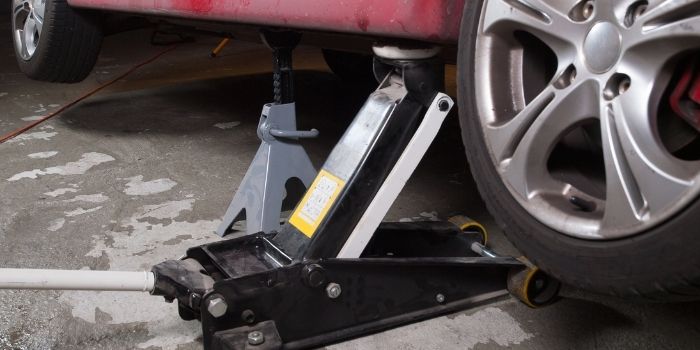
Lifting a vehicle looks deceptively simple—slide the jack under, pump the handle, and up she goes. Until it doesn’t.
Anyone who has worked on lifted trucks, SUVs, or vehicles with long-travel suspension knows the frustration: your floor jack runs out of lift long before the tires leave the ground.
That’s usually when the idea hits—“What if I just extend the jack?”
A homemade floor jack extension can seem like a clever, budget-friendly workaround. And in some situations, it can be.
But here’s the uncomfortable truth most DIY videos gloss over: improper jack extensions are one of the fastest ways to turn a routine repair into a garage disaster.
This guide doesn’t just tell you how to make and use a jack extension—it shows you where most people go wrong, why those mistakes are dangerous, and how to avoid them using sound mechanical logic.
Whether you’re working on a daily driver, a project car, or a lifted truck, this article will help you lift smarter—and safer.
Homemade Floor Jack Extension – Is It Safe?
Short answer: It depends—on design, materials, and how you use it.
A floor jack is engineered as a complete system. The saddle diameter, lift arc, hydraulic pressure, and load path are all designed to work together.
When you add height between the saddle and the vehicle, you’re changing that system—sometimes dramatically.
What changes when you add an extension?
- Center of gravity moves upward
- Side-load forces increase
- Contact area often decreases
- Load stability becomes more sensitive to surface angle
This doesn’t automatically make a homemade floor jack extender unsafe—but it shrinks your margin for error.
Professionally manufactured jack extensions are tested for:
- Compressive load limits
- Deformation under sustained pressure
- Slippage resistance
- Compatibility with jack saddles
DIY versions rely entirely on your design decisions. If those decisions ignore physics, metallurgy, or real-world forces, safety disappears quickly.
When a homemade extension can make sense
- Temporary lift to place jack stands
- Flat, reinforced steel extension designs
- Used on solid jack points (axle housings, frame rails)
- Low side-load applications
When it absolutely doesn’t
- Uneven or soft surfaces
- Using wood or stacked blocks
- Lifting on suspension components
- Working under the vehicle without jack stands
If you treat a jack extension as a tool for positioning, not a load-holding device, you’re already thinking correctly.
5 Mistakes to Avoid With DIY Floor Jack Extension
A homemade floor jack extension sits right at the intersection of ingenuity and risk.
Done correctly, it can solve a real-world problem—especially for taller vehicles and limited-reach jacks. Done carelessly, it becomes one of the most dangerous tools in your garage.
Avoid these mistakes, and you eliminate the majority of jack-related accidents.
1: Using Wood or Composite Materials
Wood compresses under load. It cracks without warning. It absorbs oil and moisture, reducing friction and stability.
Even hardwood blocks that seem strong can fail suddenly—especially under dynamic load as the jack rolls slightly during lifting.
Rule: If it came from a lumber pile, it doesn’t belong under a vehicle.
2: Making the Extension Too Tall
The taller the extension, the more leverage gravity has against you. Even a small lateral shift becomes magnified.
This is how vehicles tip—not because the jack failed, but because physics won.
Rule: Add the minimum height needed to place jack stands. Nothing more.
3: Ignoring Saddle Fitment
A loose extension that doesn’t seat into the jack saddle is a recipe for slippage.
Many floor jacks have:
- Curved saddles
- Retaining lips
- Rubber pads
Your extension must account for this geometry.
Rule: Flat on flat is not enough—mechanical retention matters.
4: Lifting on the Wrong Vehicle Point
Even with a perfect extension, lifting on weak or angled components introduces side-load forces the jack was never designed to handle.
This is especially risky with lifted vehicles where angles are already exaggerated.
Rule: Lift on structure, not suspension.
5: Treating the Extension as Load Support
This is the most dangerous mistake of all.
A jack—any jack—is a lifting device, not a support stand. A homemade floor jack extender does not change that fact.
Rule: Jack stands are non-negotiable. Always.
| Feature | Safe Practice | Unsafe Practice |
|---|---|---|
| Material | Solid steel | Wood, PVC, scrap |
| Height | Minimal increase | Excessive stacking |
| Saddle Fit | Recessed / locked | Loose or flat |
| Usage Time | Temporary lift | Long-term support |
| Load Holding | Jack stands used | Jack only |
How to Make Your Own Floor Jack Extension at Home?
Let’s be clear: this is not a project for scrap wood, random pipes, or leftover lumber from a shelf build. A jack extension is a structural component, not a spacer.
A proper floor jack height extender should distribute force evenly and maintain full contact with the jack saddle. Here’s how you can start…
Step 1: Measure Your Jack and Identify the Real Height Gap
Before touching any tools, measure your floor jack’s maximum lift height and compare it to the minimum height needed to place your jack stands safely.
This prevents overbuilding. A shorter extension is always more stable than a tall one, so aim to add only the height you truly need—not what feels comfortable.
Step 2: Choose the Right Material (Steel Only)
Select a solid steel block or thick-wall steel tubing capable of handling compressive loads well beyond your jack’s rated capacity.
Avoid wood, aluminum, PVC, or stacked materials. The extension must resist deformation, not just hold weight momentarily.
Step 3: Match the Extension Base to the Jack Saddle
The bottom of the extension should seat securely into the jack saddle. Ideally, machine or grind a shallow recess that mirrors the saddle shape.
This mechanical fit prevents side-to-side movement as the jack rolls slightly during lifting—something many DIY builders overlook.
Step 4: Create a Flat, Load-Spreading Top Surface
The top of the extension must be perfectly flat and wide enough to distribute the vehicle’s weight evenly.
A narrow or uneven contact point concentrates stress and increases the risk of slipping. If needed, weld a steel plate to the top to improve load distribution.
Step 5: Secure and Finish the Extension Properly
If your design involves multiple steel components, fully weld all seams around the perimeter—spot welds are not enough.
Remove sharp edges, burrs, and slag, then clean the surface to ensure proper contact and grip during use.
Step 6: Test the Extension Without a Vehicle First
Before lifting a car, test the extension under controlled load conditions—such as pressing it between the jack and a solid steel surface.
Look for any signs of shifting, bending, or instability. If something feels off now, it will be worse under a vehicle.
Step 7: Use It Only as a Lifting Aid, Not a Support
Once built, remember the golden rule: the extension is for temporary lifting only.
Raise the vehicle just high enough to position jack stands, then lower it onto proper supports. Never leave a vehicle suspended on a jack and extension alone.

How to Use Your Homemade Floor Jack Extension Correctly?
Keep in mind, even a perfectly built extension can become dangerous if used improperly. Technique matters just as much as construction.
Step 1: Set Up on Solid, Level Ground
Always position the jack on hard, flat, and level concrete.
Uneven or soft surfaces amplify instability once the extension raises the load higher than normal. If the ground isn’t solid, the safest extension in the world won’t save you.
Step 2: Inspect the Jack and Extension Before Every Lift
Check the jack for hydraulic leaks, smooth saddle movement, and proper rolling action.
Inspect the extension for cracks, deformation, or contamination from oil or grease. Any defect—no matter how small—is reason enough to stop.
Step 3: Seat the Extension Securely in the Jack Saddle
Place the extension squarely into the jack saddle so it sits flat, centered, and fully supported.
There should be no rocking or side play. A properly seated extension becomes part of the jack; a loose one becomes a liability.
Step 4: Align the Load Point Carefully
Position the extension directly under a strong, manufacturer-approved lifting point, such as a frame rail or axle housing.
Misalignment creates side loads that increase as the vehicle rises—one of the most common causes of jack instability.
Step 5: Lift Slowly and Watch for Movement
Raise the vehicle in small, controlled increments while observing the extension and jack for shifting.
If anything tilts, creaks, or moves unexpectedly, lower the vehicle immediately and reset. Smooth, predictable motion is your green light.
Step 6: Transfer the Load to Jack Stands Immediately
Once the vehicle reaches the desired height, place jack stands and lower the vehicle onto them right away.
The extension is only a lifting aid—not a support system. Never work under a vehicle supported solely by a jack and extension.
Step 7: Lower Carefully and Store the Extension Properly
After completing the job, lower the vehicle slowly, remove the extension, and store it in a clean, dry place.
Keeping the surfaces free of oil and debris ensures consistent performance the next time you use it.
Can I use a homemade jack extension on a lifted truck?
There’s also no legal safety net to fall back on. While personal garage use isn’t regulated, commercial shops must rely on certified equipment—and for good reason.
When you build and use your own extension, all responsibility rests squarely on you.
Also be aware that capacity matters more than most DIYers realize. Your extension should comfortably exceed the jack’s rated load, because structural failure often occurs long before steel shows obvious signs of distress.
That’s one reason professionally made extensions are generally safer—they’re engineered, tested, and consistent. DIY versions live or die by material choice, design accuracy, and workmanship.
Final Thoughts
A homemade floor jack extension can be useful—but only when it’s treated with the respect a load-bearing tool deserves.
Yes, you can use one on a lifted truck, but strictly to reach jack-stand height and only if it’s built from solid steel and seats securely in the saddle. Lifted vehicles already magnify instability, so shortcuts here are unforgiving.
The bottom line is that a jack extension should be a temporary lifting aid, not a permanent solution.
Build it conservatively, use it briefly, and always transfer the load to proper jack stands. When it comes to lifting thousands of pounds of steel, caution isn’t overkill—it’s common sense.
Racing car spoilers have been a popular topic of debate for as long as cars have raced. Some people claim Read more

If you're like most people, you probably think of Lamborghinis when you hear the word "Lambo doors." But did you Read more
If you’ve ever wondered what keeps those old tractors, vintage motorcycles, or rugged off-road vehicles so tough and reliable, the Read more

If you're new to car repair projects or just looking for a better way to complete them, you might be Read more

Based in Orem (Utah) John Paterson graduated from Utah Valley University and has begun writing in 2009. He has a large wealth of experience in writing articles related to cars, automotive repair, wheels, cleaning/maintenance, and much more. He has also written instructional articles in a similar niche for a few online publications as well. Currently, he works as a mechanic in his personal garage shop where he loves serving his countrymen from his heart.